It depends. If the alternator is internally regulated, it needs to be converted to work with an external regulator. See the next FAQ below to learn more. If the alternator is a Valeo alternator from a 2013 or newer Yanmar engine, check out our kits to do this yourself: Smart Ready Retrofit for Yanmar. If not, an alternator repair shop may be able to convert it to work with our regulators. Go to “Where to Buy“, and select repair shops in the drop-down list, or visit another shop of your choice.

The Universal Belt Buddy (UBB) is the combination of a
Universal Adjustment Arm (UAA) and the Belt Buddy
Adjustment Mechanism (BB). You can purchase the UAA and
BB separately, but most people buy them as a set under the UBB part number. The BBU is just the Adjustment Mechanism (without the UAA)
and is designed to bolt onto existing adjustment arms. The BBU has an additional shoulder on one end which wraps
around the end of an existing adjustment arm (this is why it is not the same part number as the BB). The BBU can be
employed when the UAA cannot be utilized on a particular engine. For example, the UAA cannot be used when there is
a “kink” in the existing adjustment arm, thereby changing the mounting position in the “z” axis. Balmar has
recently released the UBB2 and UAA2 which contain a 1/2″ offset or “kink” in the adjustment arm to accommodate for this
issue in many applications. One word of caution: Using the BBU will eliminate some “adjustment purchase” at the end
of the adjustment arm, so make sure that your alternator does not sit fully outboard on the existing adjustment arm
before purchasing the BBU.
Alternators are voltage control devices. We can’t directly control the current, but we can indirectly control the
current by manipulating the voltage. The whole thing is governed by Ohm’s Law: current is equal to the voltage
divided by the resistance. I=E/R. The resistance is the State of Charge of the battery. The voltage is from the
alternator. So if we have 12 volts and 0.2 ohm of resistance in the battery, we get (12 ÷ 0.2) = 60 amps. If we
raise the voltage to 14 volts we get (14 ÷ 0.2) = 70 amps. As batteries become more charged their resistance
increases and the current will to go down. So as the State of Charge increases, the resistance will increase also
to, let’s say for 0.5 Ohm, (14 ÷ 0.5) = 28 amps. This is why a depleted battery (low resistance) draws higher
current and a fully charged battery (high resistance) draws low current. So first check all connections to make
sure they are clean and tight. A bad connection creates higher resistance which reduces the current flow. One way
to increase current is to increase voltage. Balmar’s ARS-5 and MC-614 regulators are programmable, which means you
can adjust the voltage output for the alternator by making a simple adjustment from the Balmar regulator. If all
the connections are good, then try increasing the voltage a tenth or two to increase the current flow.
The wire gauge in Balmar’s regulator harnesses is 14 gauge. If you need to lengthen the harness, you might try our
newly introduced extended wire harnesses, part numbers 1020 for the MC-614 (12v) and part number 1022 for the MC-624 (24v). The standard harnesses are 54″ (4.5 feet) long, where these new
extended harnesses are 120″ (10 feet) long. If you need to extend the wires beyond 120″ (10 feet) the wires will
need to fully replaced with 12 gauge wires to account for voltage drops along the longer runs.
The problem with multiple charging sources is they tend to fool one another. Say your battery is at 12 volts. You
start one engine and its alternator begins charging the battery, raising the voltage to 14 volts. When the second
engine/alternator starts up it sees not the true State of Charge of the battery (12 volts) but 14 volts from the
other alternator. The second alternator thinks the battery is fully charged and puts out the minimum current
possible. The result is only one alternator is doing all the work and the other is just coasting. This isn’t
damaging but it is inefficient charging. Balmar’s CenterfielderII is designed to solve this problem by acting as a
“traffic cop” and combine the output from both alternators.
One of the common characteristics of Balmar high-output alternators is the need for an external voltage regulator.
There’s a really good reason for that. A smart, multi-stage regulator (like our Max Charge MC-614 or our ARS-5) lets us modify voltage throughout the charge
cycle to enable our alternator to supply charging current in a manner that’s most compatible to the battery being
charged. In today’s boating environment there are several different battery technologies – Gel Cell, AGM, Deep Cycle
and Standard Flooded, Spiral Wound AGM – with others being developed and marketed with increasing frequency, and all
share one common trait. None want to be charged the same way. This can be a real problem for the standard,
manufacturer-installed alternator. Like the alternator you can find under the hood of your car, the typical OEM
alternator is controlled by a very simple built-in voltage regulator. In nearly all cases, this built-in regulator
is designed to charge at a non-adjustable, unchanging voltage. While that’s a reasonable charging solution for a
small battery that’s normally being charged whenever it’s being used, that just doesn’t work well when you’ve got
big deep cycle batteries to charge.
In comparison, alternators with external multi-stage voltage regulators are able to charge large, deep-cycle battery
banks similarly to smart shore power chargers – by modifying charging voltage to meet the changing needs of the
battery bank as the batteries become more fully charged. In addition, a smart regulator can be programmed to match
the voltage requirements of a variety of battery technologies, as each battery type has a range of target voltages
that ensures a safe and efficient charge profile.
The current generation of Balmar’s multi-stage Max Charge and ARS-5 regulators have an additional feature that is
critical to the health of Gel Cell, AGM and other sealed battery technologies. By adding an optional battery
temperature sensor, the installer enables the Balmar regulator to monitor for changes in ambient battery temperature
and modify charging voltage to compensate for warmer or colder temperatures. This allows the charging system to
maintain optimal charging without damaging over- or under-charging. So … is the multi-stage regulator worth the
extra cost? If your batteries represent a sizable investment, the answer is absolutely “YES”.
By nature, high-output alternators can be brutal on drive belts. If a serpentine pulley conversion kit is out of
the question, are there other ways to minimize or eliminate messy black dust, or belt failures that can lead to a
ruined boating trip? There are a number of ways that belt dusting can be addressed. The easiest way, when using
our Max Charge or ARS-5 voltage regulators, is by adjusting the regulator’s Belt Load Manager. This regulator
adjustment feature enables the user to modify the regulator’s field pulse bandwidth to reduce the horsepower load
the alternator applies to the belt. The wider the pulse bandwidth, the less stress on the belt.
While the Belt Load Manager is very effective at reducing belt stress, it’s always important to ensure that the
problem is not a result of wear caused by poor pulley alignment. Pulley alignment can often be measured by placing
a straightedge across the front of the alternator and crankshaft pulleys and identifying any mis-alignments. In
addition, pulleys should be inspected for rust, nicks or other irregularities that could cause premature wear.
Quite often, the source of excessive belt wear can be attributed to the geometry of the crank, alternator and water
pump pulleys. If the amount of contact area between the belt and the alternator pulley is limited due to a
less-than-ideal drive angle, the issue can be remedied by replacing the alternator pulley with a larger diameter
pulley. Click Here to review Balmar’s offering of replacement
pulleys.
Another effective belt dusting solution may be replacing the standard belt with a higher capacity aftermarket belt.
Notched Vee belts, like those sold under the Dayco Top Cog brand, may provide better “grab” than traditional smooth
profile Vee belts, resulting in better power transfer and less premature wear. Newer belt technologies that
integrate stronger, more stretch-resistant fibers may also provide a marked improvement over standard Vee belts.
Even under the best conditions, belts do have a tendency to stretch. The best way to avoid dusting and premature
belt failure is to closely monitor and correct belt tension. We recommend that you inspect your belts on a frequent
and regular basis to ensure that your belt never has an opportunity to loosen and slip.
A tachometer typically measures “pulses” from the stator poles of the alternator to count RPMs. Since the AT-Series
Alternator has 16 stator poles instead of the usual 12 poles, some legacy tachometers are unable to adjust for this
difference. First determine if your existing tachometer is “adjustable” for this situation. If your tach is not
adjustable, Balmar provides a Tach Signal Stabilizer (part number 15-TSS) to adjust for stator pole count
differences. Installation instructions for the 15-TSS are provided on the product page
link.
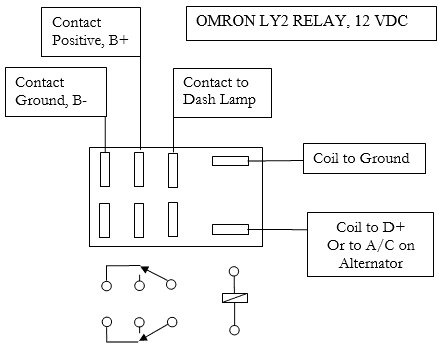
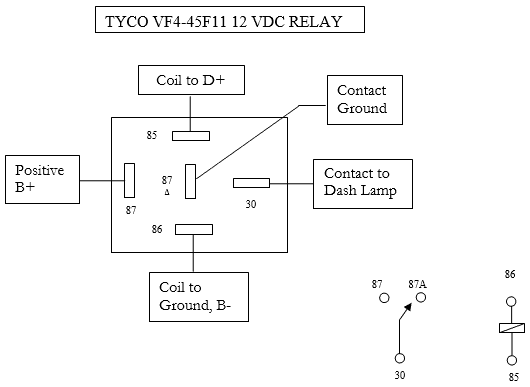 2. If you have installed any other Balmar Alternators that do not have a D+ circuit then you can use a 6 volt automotive
style relay, like the Tyco VF4-15D11-C06 or an OMRON LY2 relay. Connect the relay as shown in the drawing below. The
OMRON LY2 coil will work when connected to the A/C terminal on the alternator.
2. If you have installed any other Balmar Alternators that do not have a D+ circuit then you can use a 6 volt automotive
style relay, like the Tyco VF4-15D11-C06 or an OMRON LY2 relay. Connect the relay as shown in the drawing below. The
OMRON LY2 coil will work when connected to the A/C terminal on the alternator.